ESign Installation Guide - Sideload Apps on iOS Without Jailbreak
Step-by-step guide to install ESign on iPhone/iPad. Set up in 5 minutes with P12 certificate import and IPA signing. Works on iOS 16/17/18 and later.
Before You Begin
Make sure your device meets these requirements before installing ESign:
| Requirement | Details |
|---|---|
| Device | iPhone or iPad |
| iOS Version | iOS 16.0 – iOS 26.x |
| Certificate | P12 signing certificate (premium or free) |
💡 Which certificate should I choose? If you just want to try things out, grab a free certificate (available periodically). For long-term, reliable use, we strongly recommend getting your own dedicated P12 certificate — valid for up to 360 days.
Step 1: Choose Your Installation Method
ESign offers several ways to get started. Pick the one that fits your needs:
| Method | Best For | Certificate Validity | Recommendation |
|---|---|---|---|
| Premium P12 Certificate | Long-term users who need stable signing | ~360 days | ⭐⭐⭐⭐⭐ |
| Free Certificate | New users wanting to test features | Usually a few days | ⭐⭐ |
| Self-Signing | Developers with existing certificates | Depends on your certificate | ⭐⭐⭐⭐ |
👉 Head to the Installation Page to choose your option
Step 2: Download and Install ESign
What You’ll Need
- Using Premium/Free Certificate: Have your certificate code ready
- Using Your Own Certificate: Download your
.p12and.mobileprovisionfiles to the Files app first
Let’s Get Started
Go to the ESign Installation Page and select either “Redeem & Install” or “Self-Sign Install”
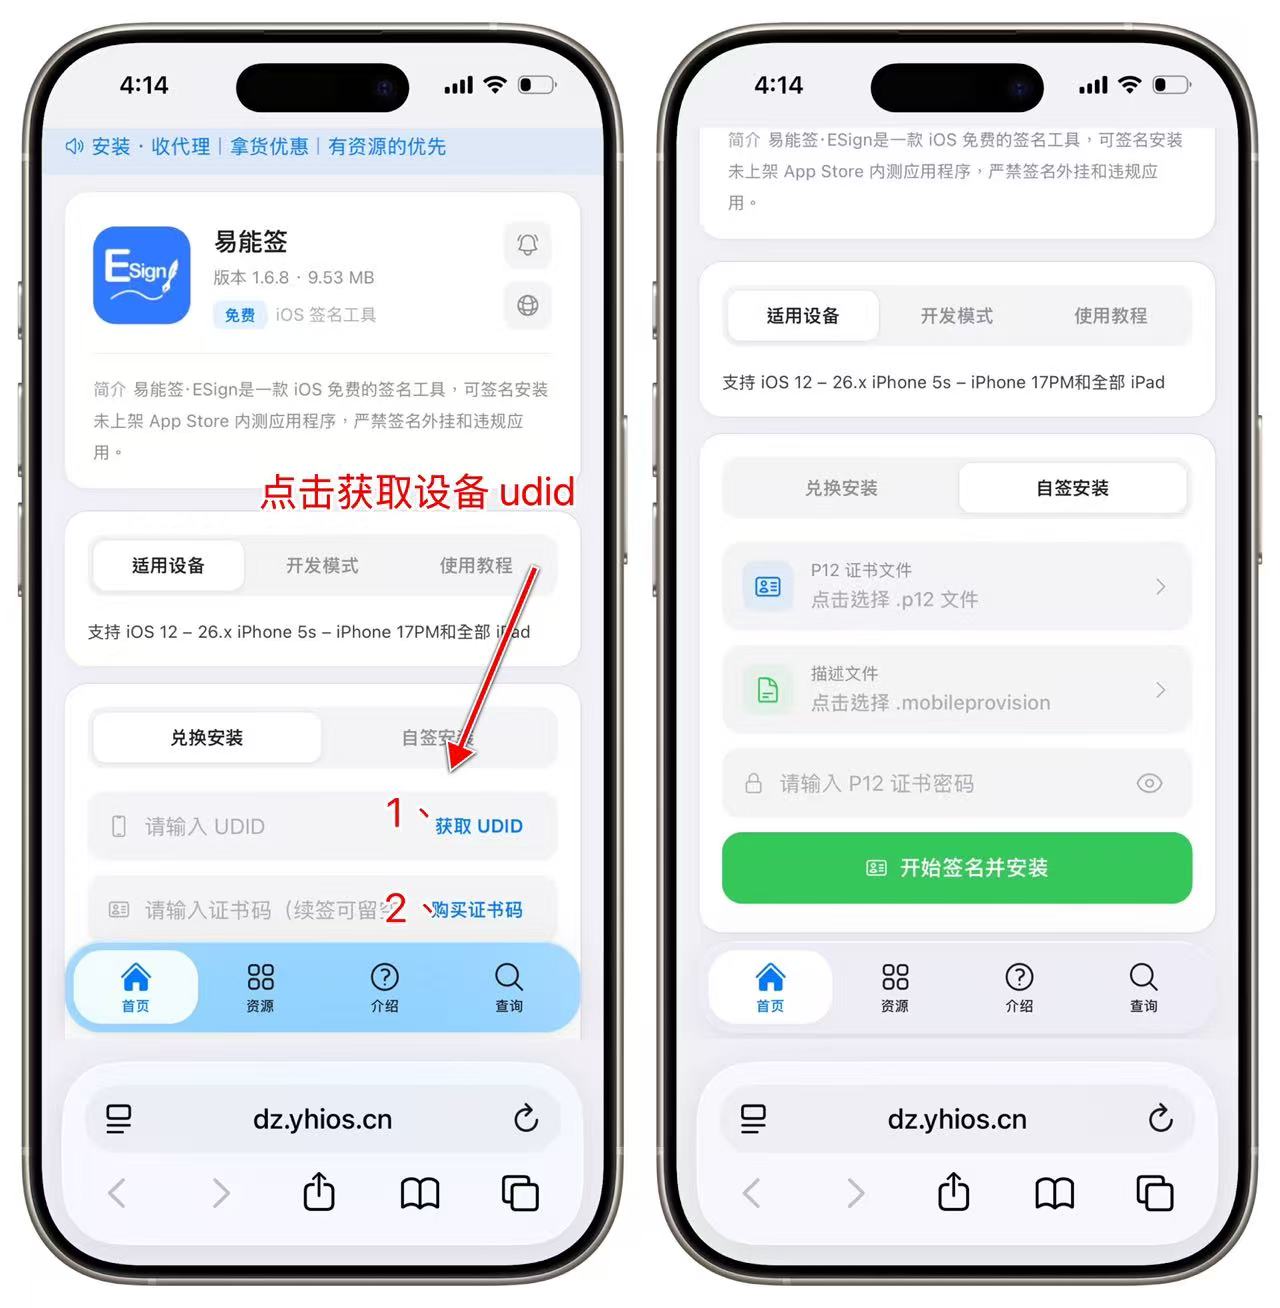
Option A: Redeem & Install (Recommended for Beginners)
- Tap “Get UDID” — you’ll be prompted to install a configuration profile. Tap Allow.
- Once complete, enter your certificate code
- Tap “Sign & Install”
- Wait for the process to finish, then tap Install
Option B: Self-Sign Install (For Users with Certificates)
- Upload your
.p12certificate file and.mobileprovisionprovisioning profile - Enter your P12 certificate password
- Tap “Sign & Install”
- Wait for the process to finish, then tap Install
Step 3: Enable Developer Mode
⚠️ Important: This step is required! On iOS 16 and later, Developer Mode must be enabled or ESign won’t launch.
How to enable it:
- Open Settings on your iPhone
- Go to Privacy & Security
- Scroll to the bottom and find Developer Mode
- Toggle it on and restart your device when prompted
- After restarting, confirm to enable it
📱 Don’t worry — enabling Developer Mode won’t affect your phone’s normal operation or security.
Step 4: Import Your Certificate into ESign
After installation, you’ll need to import your certificate before you can start signing apps.
For Redeem & Install Users (Automatic Import)
If you installed via the official ESign channel:
- Open the ESign app
- Go to Settings → Certificate Management
- Your certificate will be imported automatically — no action needed
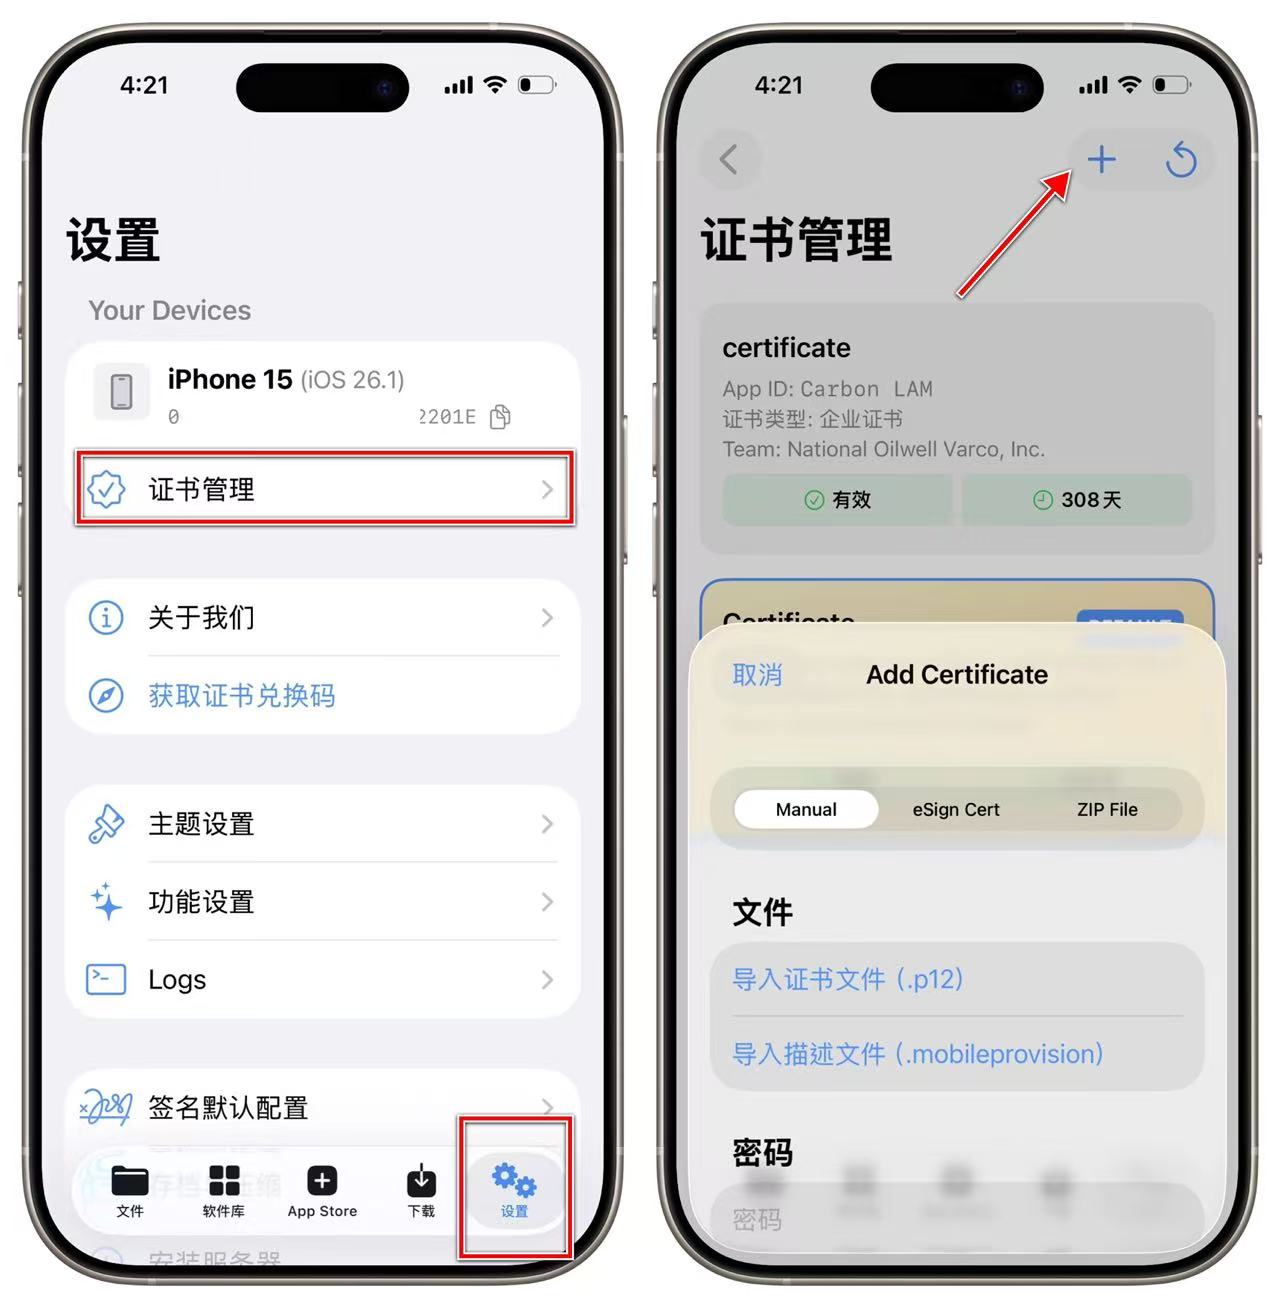
For Self-Sign Users (Manual Import)
- Open ESign and go to Settings → Certificate Management
- Tap Import and select your
.p12and.mobileprovisionfiles - Enter your P12 certificate password to complete the import
Step 5: Sign and Install Your First App
You’re all set! Time to sign your first IPA.
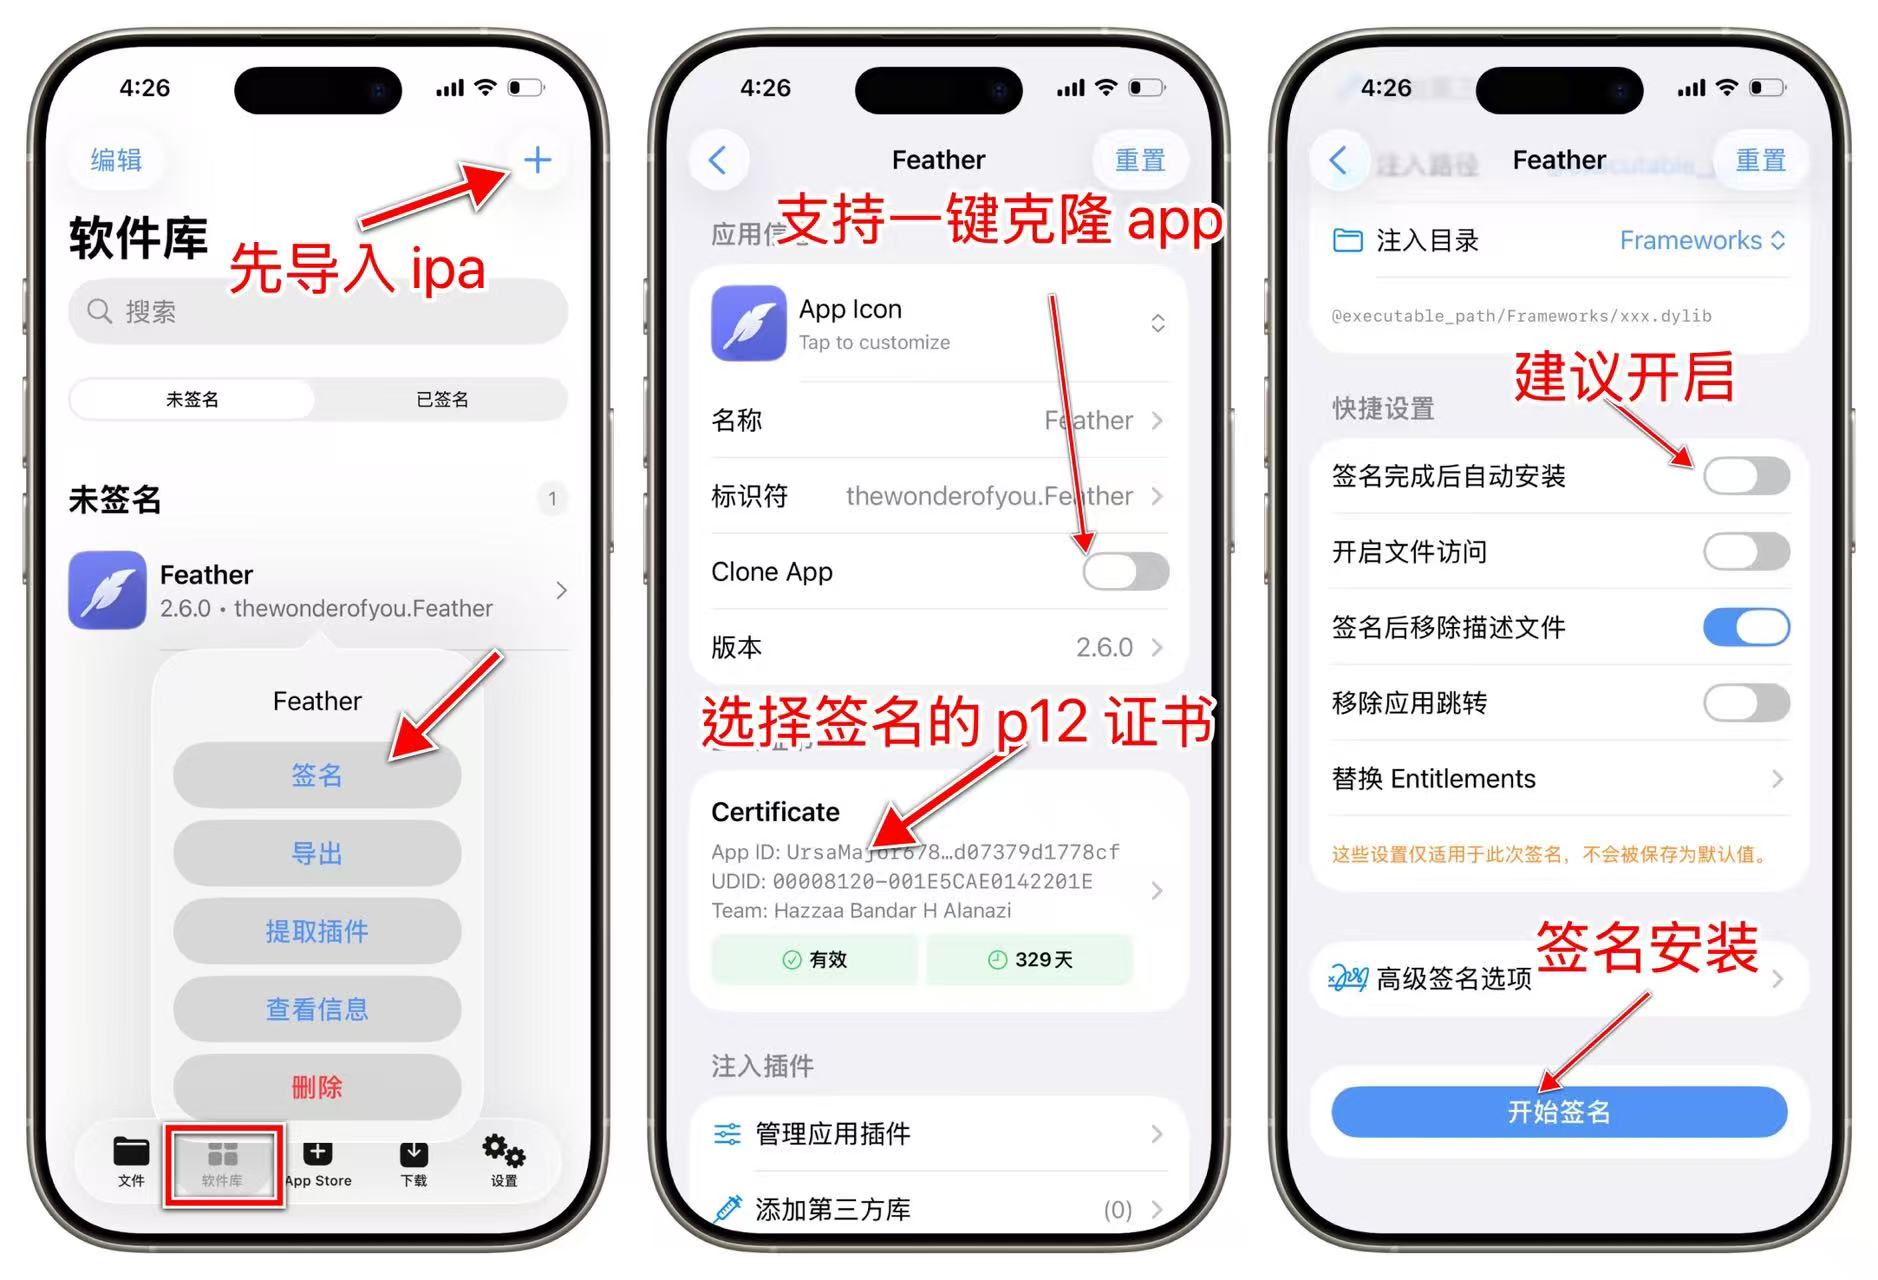
- Open ESign
- Tap the “Apps” tab at the bottom
- Import your IPA file using any of these methods:
- Select from the Files app
- Paste an IPA download URL directly
- Tap an IPA link in Safari and choose “Open in ESign”
- Select your signing certificate
- Tap “Sign”
- Once signing completes, tap “Install”
🎉 Congratulations! You’ve successfully signed and installed your first app.
Frequently Asked Questions
Q1: I’m getting “Unable to Install” after signing. What do I do?
This is the most common issue for new users. Here’s how to fix it:
- Check Developer Mode: Make sure it’s enabled and you’ve restarted your device
- Trust the Certificate: Go to Settings → General → VPN & Device Management, tap your certificate, and select “Trust”
- Verify Certificate Validity: Ensure your certificate hasn’t expired
Q2: I can’t find my imported IPA file?
ESign supports multiple import methods:
- Import directly from the Files app
- Tap an IPA download link in Safari and select “Open in ESign”
- Paste a download URL in ESign’s Library section
Q3: Can’t import IPA via the Share menu?
Due to restrictions in iOS 16 and later, importing files via the Share menu may not always work.
Workaround:
- Save the IPA file to the Files app first
- Open ESign’s Library
- Tap Import and select the IPA from Files
Q4: What happens when my certificate expires?
When your certificate expires, all apps signed with it will stop opening. To fix this:
- Get a new valid certificate
- Import it into ESign
- Re-sign and reinstall your apps
💡 Pro tip: Renew your certificate before it expires to avoid sudden app failures.
Q5: Which iOS versions does ESign support?
ESign supports iOS 16.0 through iOS 26.x and newer. Devices running iOS 15 or earlier are not supported.
What’s Next?
Got questions? Join the ESign community for help and tips!